
Expansion & Contraction of Hardwood Floors
“The flooring shop stated to depart 10mm for wood floor expansion in the walls…the boards are lifting started.” Ill informed advice such as this frequently results in floor problems. Many flooring sales agents not really acquainted with wood flooring assume expansion is equivalent to laminate floors. The truth is that 10mm isn’t enough for wood flooring.
What’s An Expansion Area? So Why Do We Want It?
Expansion areas are spaces left round the perimeter of rooms, against fixed objects for example posts, thresholds, hearths, skirting boards, along with other stationary products built or guaranteed in to the framing structure of the house. Despite the fact that Hardwood floors used is not living and breathing still it reacts to moisture alterations in the atmosphere. Cells within the wood will require on or absorb moisture once the relative humidity is high, or when uncovered to water. Expansion happens, and also the hardwood grows, for insufficient a clearer term, over the grain (width) from the plank (see below, not every will react by doing this). On the other hand when air moisture levels decrease, moisture content evaporates, shrinking from the wood will occur.
Whenever we say spaces, they’re understood to be installing the hardwood floors as much as and from the fixed objects. For instance “we advise a minimum of 15mm promising small to medium area-18mm expansion on bigger areas in the skirting board or wall if new skirting to become fitted.”
Hardwood floors can respond to the existence of moisture. Within the dry winter heating several weeks, moisture can leave the wooden flooring resulting in the floor to contract slightly in dimensions, which could leave slight gaps in between each floor board. Within the summer time several weeks once the humidity is greater, the hardwood floors will expand and also the gaps will appear reduced. If there’s an excessive amount of moisture within the subfloor it’ll make the wood planks to cup, or buckle. Almost all problems associated with hardwood floors result from improper installation and sub floor preparation. For this reason it’s important when installing hardwood floors that you simply stick to the correct suggested installation methods through the manufacturer.
Direct Glue Installations
An immediate glue installation requires using a flooring adhesive applied directly to the subfloor (never directly affect it’s). This process may be used on concrete and wooden subfloors. When done properly this is actually the most stable way of fitting wood flooring because the elastic flooring adhesive enables the ground to grow and hire no problems.
If you’re lounging more than a concrete subfloor you’ll first need checked the concrete moisture, when the floor includes a moisture content well over 4% then either hold back until the sub floor dries to satisfy this level or make use of an appropriate moisture barrier, we advise Sika Mb Primer to make sure no moist increases up to your new floor.
Also observe that new concrete slabs require no less than two months drying time before covering all of them with a wood floor.
All Concrete sub-floors should be dry, smooth, level and free from structural defects. When the concrete sub floor is uneven we advise using sika latex self leveling compound to level the subfloor. The concrete should also be free from contaminants i.e. paint, oil, wax grease, dirt and curing compounds (the reason behind this is you require the self leveling compound to bond towards the sub floor).These could be removed chemically or robotically as the local home improvement store and they’ll sell the correct floor cleaner, but don’t use solvent-based strippers under any conditions. Using residual solvents can make issues with the connecting of flooring glues. You should ensure an effective bond between your glues and concrete and wood panels.
For those who have a wood subfloor you will have to lay a plywood base within the existing floor boards (we advise using 4mm -6mm exterior grade plywood and screw lower every 15cm across the edges and also at 20cm times throughout all of those other board while using 1 ” deck screws) before installation, this can then provide you with a smooth and level surface that you should install you hardwood floors onto.
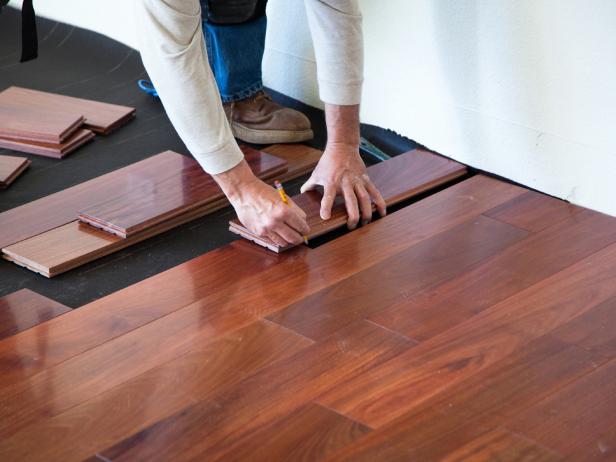
You will have to leave a 15mm expansion gap round the perimeter from the room for big areas over 6 meters long we advise 18mm expansion gap. To keep this gap during installation spacers are supplied within the kits. Once you have installed the hardwood floor you are able to cover this expansion gap with scotia or new skirting boards The 15mm expansion gap must also remain in doorways in which the hardwood floor follows through in one room to a different we sell on this web site a complete selection of door profiles available to fit your floor.
Nailed Lower Installations
Nailed lower installation may be the traditional method to install hardwood flooring and could be done either directly onto wooden subfloor or on the concrete subfloor by using battens. When fixing battens onto concrete you may need a power-actuated nailer they are driving with the battens and connect into the concrete, first of all construct polyethylene moisture sheet then plywood within the battens to produce a new sub floor. We advise 12mm exterior grade plywood and 2inch x 4inch battens. Lay battens around perimeter at ½ inch in the wall, leave ¼ inch gap each and every finish. Squeeze first batten so its center is 16 inches in the outdoors fringe of the perimeter batten. Construct the rest of the battens over the area 16 inch times. Check you battens are level using an amount gauge you may want to use cedar plank shims to even out dips within the concrete, slide the shims underneath the battens until level. (If uncertain we advise talking to an expert fitter with this method).
Wooden Subfloor
Hardwood flooring could be nailed into existing wooden subfloors for example floorboards or plywood although not into chipboard floors as these aren’t sufficiently strong to carry their nails. The floorboards should be in good shape and level otherwise you should lay 6mm exterior grade plywood lower first.
To prevent creaking, check within the subfloor and safely fasten any loose floorboards. For additional soundproofing it’s also advisable to utilize a standard foam underlay.
Whenever you nail lower a good wood floor you utilize a Porta Nailer they are driving a nail in a 30 degree position with the tongue and in to the subfloor. Porta Nailers could be hired from the good hire shop but they are costly to purchase.
Again you will have to leave a 15mm expansion gap round the perimeter from the room. To keep this gap during installation spacers are supplied within the installation kits.