
This is the time to color the outside of your house. It is advisable to start painting around the sunny side of your house first and the reason behind this is because it’s likely there’s still dew around the shaded side of your house each morning. Tip: Your home should be perfectly dry to be able to start painting.
Before you begin painting, it may be beneficial to keep close track of the elements for rain or snow. You won’t want to start painting simply to stop abruptly due to the weather.
How warm does it need to be to be able to paint your house? For many paints it typically needs to be 37 levels or warmer to be able to paint the outside of your home. Now if you’re painting two jackets of paint in your house which is 55 levels or cooler during the day, it may be beneficial to color the very first coat eventually and use the second coat the next day. If you reside in a very dry climate, like Denver, as well as your painting within the summer time several weeks, you are able to defiantly apply two jackets in a single day. However, the greater damp climates within the south, it’s still suggested to color just one coat each day.
Looking for a quality painting contractor? Look no further than the local, pre-screened painters at house painters spring hill fl. From interior painting to exterior painting, these professionals will get the job done right.
Note: Using an airless paint sprayer. I am sure the man in the rental store demonstrated you ways to use the airless (typically together with his limited experience with really painting a home), so hopefully I’m able to provide you with a couple new tips on how to paint your house utilizing an airless paint sprayer. When you initially obtain the airless home, place it in the center of the region that you’d like to begin painting. Typically the size of the hose is about 50′. Extend the hose just before painting to ensure that it’s not necessary to be worried about unraveling it when you are painting on the ladder. It may be beneficial to possess a 100′ extension cord to be able to bring the airless anywhere you want to color with no limitations. Tip: before you decide to connect the airless in to the extension cord, Make Certain THE AIRLESS IS OFF! You wouldn’t want the airless to begin pumping without paint! Now, when you attend setup the airless, before you decide to switch it on, it is a good guideline to possess a second empty bucket alongside your bucket of paint. I’ll explain why inside a second. Place both buckets alongside and put the intake hose (using the wire mesh filter finish) to your 5 gallon bucket of paint as the primer hose (often a lot smaller sized, about how big a pencil’ish) is positioned within the empty bucket of paint. Before you decide to switch on the device make certain the airless is placed to prime the device first. There’s a primer valve that you could rotate between prime and paint. A great way to find out if the valve is placed to prime or paint is to do this little test just before turning the device on. While turning the valve clockwise a few occasions you will see that the valve handle will outside of the device in a single position (departing a small crack between your valve and machine) as the other squeeze valve is near to the machine. The positioning where the valve is separated in the machine is the primer position. Do that multiple occasions to determine what I am speaking about. Don’t be concerned should you continue spinning the valve, you are able to spin it millions of occasions one way also it will not hurt it.
Once you determine which position is prime and which position is spray, put the valve within the prime position and carry the primer hose. Point the primer hose within the empty bucket close to the top and also at an aproxx.45 degree position in the side (the reason behind this really is that there’s apt to be pressure still developed within the airless and when you initially turn on the airless to prime it, paint will probably burst from the primer hose and you won’t want to get it go everywhere). Now turn the airless paint sprayer on and you will find that the airless is sucking in the new paint and pumping the primer hose. Initially you’ll typically visit a cleaning solution emerge adopted from your paint. If you notice your paint being released transition the primer valve to another position and you’ll begin to see the airless pumping paint in to the primary hose.
Now that you’ve got primed the airless, make certain there is not some advice within the gun from the airless and produce it to the empty bucket. Since there’s typically cleaning solution within the hose resulting in the gun it may be beneficial to spray that out before you see thick paint being released. After you have thick paint being released you might place your tip in. Keep in mind that the end may have an arrow somewhere from the handle that shows how it should be in, to be able to spray.
When spraying your home, it’s a good guideline to spray in direction of the grain from the material. If you have siding that runs horizontal, you need to spray inside a horizontal style. Also, when you attend spray, the gun ought to be roughly 12″ in the material that you’re spraying. Don’t pull the handle to spray together with your hands still. This can spray lots of paint in a single place causing it to drip. And so do your hands moving when you attend depress the handle. This gives an even turn to your paint.
Tip: you are able to tell once the bucket of paint gets low once the airless starts pumping really loud and does not stop. Simply tip the nearly empty bucket of paint, in an position so the mesh filter is included and wait for a airless to trap up and prevent pumping. Sometimes it is simply simpler to simply to exchange the bucket of paint using the brand new one so when that starts going lower, pour the surplus in the old bucket in to the brand new one.
Now that you’ve got the airless paint sprayer as well as your extension ladders you’re ready to paint your house. I’d recommend painting the siding of your house first before painting the trim. It is because is so that you can just spray the home as quickly as you are able to without having to worry about painting a piece of trim that you simply already colored. So paint the siding and soffit first adopted by painting the trim. Painting the siding utilizing an airless paint sprayer is going pretty fast.
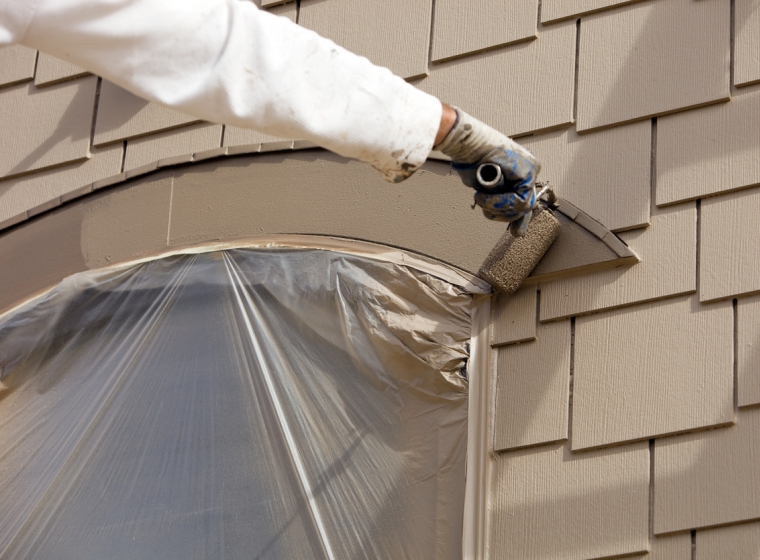
Following the siding of your house is colored now you can begin painting the trim. There’s a couple different methods for you to start painting the trim of your property. The very first strategy is to mask off all the trim to be able to just spray the trim color to your house, and also the second strategy is to roll the trim by hands. If you’re alone painting the home I would suggest moving the trim by hands. It is because happens because it requires a lengthy time for you to mask off all the trim in your home when compared with just moving the face area from the trim boards. For those who have multiple people, it might be faster to achieve the helpers mask everything off when you start spraying the trim color.
Airless Tip: For those who have someone who can begin masking from the trim, ask them to begin that although you are converting the airless to a different color. When altering colors by having an airless paint sprayer it may be beneficial to possess a second bucket filled midway with water that is clean. Put the intake hose within the water that is clean lightly without obtaining the old color all around the water. Go ahead and take tip from the airless and spray all the old paint from the hose and back to its original paint bucket. Be cautious when you are performing this that you simply recognize once the paint starts turning watery. If this does point the gun in to the first bucket and spray until it appears pretty clean. It does not have to be perfectly clean. If this looks good, clean from the intake line within the clean bucket and obtain that old color from the intake line. Now put the intake line inside your new trim paint.